Getting to know your new compass
Compass Skills 1
“Choose your path, set your bearing, then start moving."
In developing the YAK, we started by reviewing, list after list posted by many respectable and recognized outdoor organizations. Consistently, the 10 essentials were identified as a critical component of any kit geared toward keeping its holder safe. To review the updated 10 essentials are:
- Navigation
- Sun protection
- Insulation
- Illumination
- First-aid supplies
- Fire
- Repair kit and tools
- Nutrition
- Hydration
- Emergency shelter
[Insert Shameless Plug] The Youth Adventure Kit (YAK) includes all of the essentials except nutrition. [End Shameless Plug]
This series will look at the 1st item Navigation, this post specifically at the compass. A Later post will cover using your compass with a map. While outfitting your new backpacker a compass is one of the first items to pick up.
The first question after deciding that you need a compass is, which compass to get? When you get to the store, whether it is a big box or premium outfitter you will be presented with more than a dozen different compasses. Some with mirrors, some without, some that fit on a watch, some that are a watch, the options go on and on.
At this point it doesn’t matter which compass you pick, that's right, it doesn’t matter which one you pick. At this point, you and your backpacker is just starting out, and are likely have little to no experience using a compass. Because they have limited experience, and limited knowledge you could pick any compass (note: so long as its a basic compass with at least the features on the compass pictured in figure 1 below), besides you aren’t getting their last compass you are securing their first compass. Now if your backpacker has some experience with a compass, you can still pick any compass, because they know how to use it. With all that said, the YAK’s compass is all a beginning backpacker needs to get started. It includes a magnifying glass (a twofer enlarge maps and helps start fires), and multiple map scales. It's a great compass to get started with. The next question is how does your backpacker learn to use their new compass? This is what we'll cover here.
So now that you have a compass how do you use it?
Getting to know the compass and just the compass.
With this lesson, we are going to get to know our compass. After this post, you/your scout/backpacker should know how to read the basic directions on their compass. Empowered with this newly gained knowledge about your compass one should not first head out into the wild. Learn how to use it with a map.
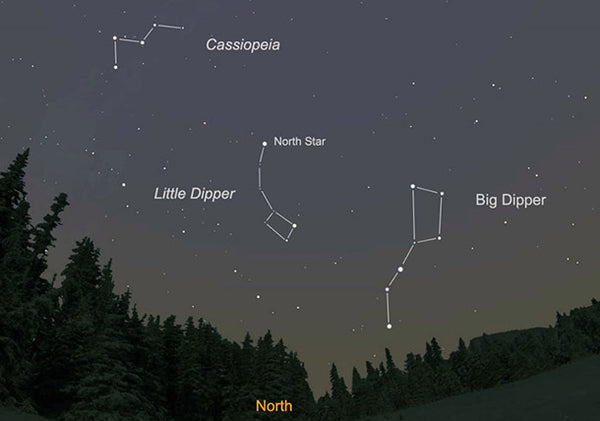
Your compass has 4 key directions. North, South, East and West. Look at your compass and learn where they are. Of all the directions North is the most important.
There are many different kinds of compasses, one for attaching to a map, one for to attaching to your thumb (generally used for orienteering).
For this post we are using a basic map compass that came with your Youth Adventure Kit (YAK) pictured in figure 1. If you haven’t received your YAK yet, than a basic compass will be sufficient. Let's take a look at it:

The floating red and black arrow is called the compass needle. It can also be red and white, but the point is, the red side always points toward the magnetic north pole. Always remember that. If you remember the compass directions and that the red needle is pointing north you are most of the way there. Simple right?
Now say you really want to go West and not North. How do you do that, you might ask.
Around the needle notice a part that turns, this is the compass housing. Around the compass, housing are numbers from 0 through 360. These will look familiar as the degrees in a circle. We will use these degree measures to take a bearing (define bearing). There are also the letters N for north, E for east, S for south, and W for west. If you wanted to go South West (SW) you would combine south and west.
Let's use that as an example: You want to go Southwest from your current position. Turn the compass housing until the direction of travel line is between the south and west (insert degree number).
With the compass flat in your hand, turn your body around until the red arrow of the compass needle is on North. The compass needle should now be lined up with the orienting lines inside the compass housing.
Special Note 1: Be certain that the red part of the needle is lined up with the north section of the compass housing. If you miss this step you would head off in the completely wrong direction. Something specific for beginners to watch out for.
Special Note 2: Another issue beginners run into is from local magnetic fields. If you are carrying something metallic, it can give you a false reading. If you are working on a park table be careful of the metal bolts, anything like this near the compass can, alter the arrows proper direction.
Once you are sure, then proceed in the direction of travel. To avoid losing your bearing also use your eyes, follow your direction of travel arrow up and find a distant point in front of you. This is where you are going. When you start walking that will be your reference point. Refer to your compass every 100 feet or so, but don't stare at it. If you spend too much time looking down at your compass you will miss everything else along the way.
Stay tuned for part 2 when we discuss using your compass with a map.
Below are resources to speed your compass skill development.
http://boyslife.org/outdoors/outdoorarticles/3877/compass-tips-and-tricks/
http://forgirls.girlscouts.org/wp-content/uploads/2013/06/CompassUse-V3.pdf

Leave a comment
Comments will be approved before showing up.
Also in News & Skills
8 CAMPING HACKS FOR COOL WEATHER CAMPING
Sign up to get the latest on sales, new releases and more …
© 2026 HMWOutdoors.
All rights reserved.
Powered by Shopify
Richard White II
Author